Connecting to a wireless home/office network
Last updated on by Freeola Support
Welcome to the Freeola internet customer support pages. This guide is designed to help with setting up a wireless network with Freeola Broadband. For more internet help topics please visit our main Support Page.
Security advice
Freeola recommends always using the latest protection available on your hardware. This will be WPA3 on modern equipment, but WPA2 is still far more common.
Select your Operating System below to jump to the relevent section of the guide.
Connecting to a Wireless Network with Windows 11
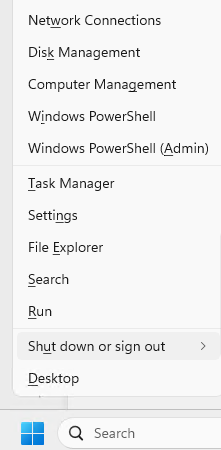
From the Windows Desktop, right-click the Start Menu and select Settings.
![Windows 11 Start Menu Right Click Options]()
In the Settings window that opens, click Network & Internet then Wi-Fi.
![Windows 11 Network & Sharing Centre]()
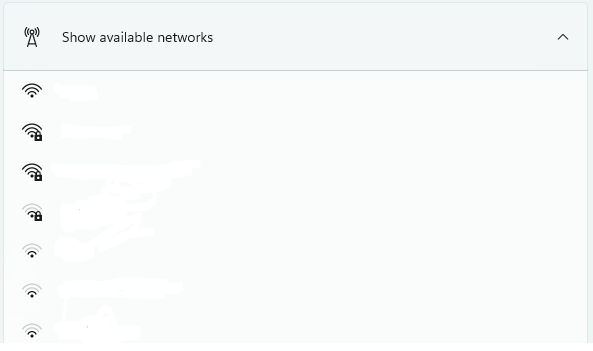
Ensure that the Wi-Fi switch is set to On, then expand the Show Available Networks tab and select your Wireless Network (otherwise known as SSID) from the provided list.
![Windows 11 Available WiFi Networks]()
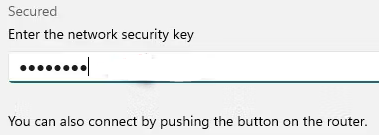
After clicking your SSID enter the Security Key (Password) then Next.
![Windows 11 WiFi Security Key]()
This will be either the WPA password you defined within your wireless router's settings, or a passcode displayed somewhere on the device itself.Assuming the Security Key was entered correctly, you'll now connect to your network.

Connecting to a Wireless Network with Windows 10
The quickest way of connecting your Windows 10 device to a wireless router is via the Network icon on the taskbar. This will appear as three curved lines emitting from a single point.
An example is shown below:![Windows 10 WiFi]()
After selecting this, a list of available WiFi Networks will appear. Select your WiFi Network Name (or SSID) from the list and click Connect.
![Windows 10 Available WiFi Networks]()
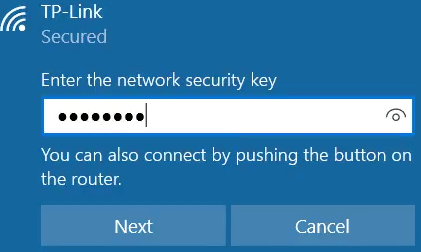
When prompted, type in your Network Password, then select Next.
![Windows 10 WiFi Password]()
This will be either the WPA password you defined within your wireless router's settings, or a passcode displayed somewhere on the device itself.Decide if you would like your device to appear on the Network to other users (not recommended for public connections) by selecting Yes or No, after which you will be connected to your chosen network.


Connecting to a Wireless Network with Windows 8
Due to the age of this Operating System, and the fact that Microsoft no longer offer security updates or support for this, it is not recommended to take devices using Windows 8 online.
From the Start Screen, or Desktop, point to the upper-right corner of the screen, and click Settings on the menu that is presented.

On the page that loads, select the Wireless icon. If your device has wireless capabilities this should be displayed by a series of bars of increasing size.

Select the network you wish to connect to and then click Connect.
You will then be prompted for a Network Security Key, this will be either the WPA password you defined within your wireless router's settings, or a passcode displayed somewhere on the device itself.
Click Next after entering the security code, when you will be asked about setting up sharing. You should could whichever option you would like enabled.

You should now be fully connected to your wireless network and able to start browsing. If you ever wish to check the status of your wireless connection, you can do so by following Steps 1 and 2 of this guide.


Connecting to a Wireless Network with Vista or Windows 7
Due to the age of these Operating Systems, and the fact that Microsoft no longer offer security updates or support for these, it is not recommended to take devices using Vista or Windows 7 online.
Go to Start, right click on Network and then click Properties to bring up the Network and Sharing Center.

As soon as the Network and Sharing Center window has loaded, click Connect to a network on the left hand side.
Select the network you wish to connect to and then click Connect.
You will then be prompted for a Security key or passphrase, this will be either the WPA password you defined within your wireless router's settings, or a passcode displayed somewhere on the device itself.

Click Connect again after entering the security code and you should then be told you have connected successfully.
If you want to save the network and connect to it automatically, make sure both options are ticked on the success screen.


Connecting to a Wireless Network with XP
Due to the age of this Operating System, and the fact that Microsoft no longer offer security updates or support for this, it is not recommended to take devices using Windows XP online.
Go to Start, click Control Panel and then double-click Network Connections.
Right click on Wireless Network Connection and then select View Available Wireless Networks.

Select the wireless network you wish to connect to and then click Connect.
You should be prompted to enter your Security key/passphrase/network key, enter the key you set within the router, or that is listed on the router itself, and click OK.


Connecting to a Wireless Network with Mac OSX
Go to the Apple Menu, click System Preferences and then click the Network icon.

If necessary, click the lock icon in the lower left to make changes.
Click Turn AirPort On if it is currently off.
Click the drop down list labelled Network Name: and select a wireless network in range.
You should then be prompted for a password if your network is protected, enter the password and click Join.


Advanced
To further configure your wireless settings, or specifically set the security type and change a password you can click Advanced... button on the bottom right of the window, then select the wireless network from the list of preferred networks, and then click the pencil icon to edit the connection.
You can use the Security: drop down list to select the security type and use the password field to change the password your computer will try to use when connecting to the network. Click Add"to update.

Live Chat is offline
Live Chat is available:
9:30am to 5:30pm Monday to Friday (excluding bank holidays).
It appears you are using an old browser, as such, some parts of the Freeola and Getdotted site will not work as intended. Using the latest version of your browser, or another browser such as Google Chrome, Mozilla Firefox, Edge, or Opera will provide a better, safer browsing experience for you.