Creating Popups in RQS
Last updated on by Freeola Support
Popup messages can be a great way of welcoming visitors to your site, highlighting limited time events or offers or can be used to simply provide more information on a subject that doesn't warrant its own page.
Using the RQS Website Builder, Popup Messages can be created to follow different 'Rules' allowing them to appear on specific pages, after a certain period of time or only when a specific link is selected.
This guide will take you through creating your Popup, and how to use it in the manner you desire.
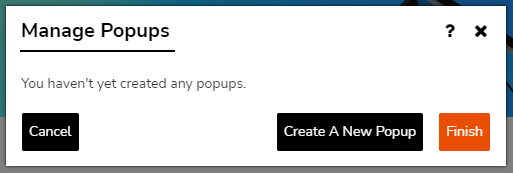
Log into the RQS Builder and select Manage Popups from the Website Tools menu. This will open the Manage Popups window.

From this window select Create a New Popup.
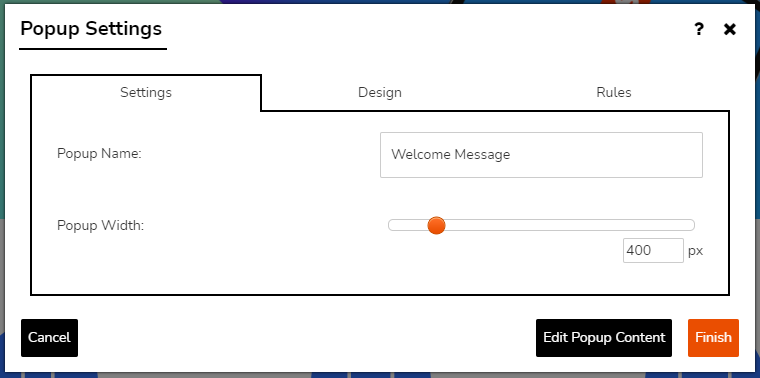
The Popup Settings window will now open which will allow you to customise your new Popup. The Settings tab provides two options:
Popup Name - What you would like to call your Popup, we would advise something memorable such as 'Welcome' or 'Special Offer'.
Popup Width - How wide you would like this message to be in pixels - you can use the slider or numerical box for this. The height will be defined by the content you enter later.

The Design tab will allow you to alter the appearance of your message. Using these options you can give your Popup a unique look, or use an existing design already created within your RQSite.
Customise - This tab will allow you to set custom background colours (or images), custom text colours as well as some more advanced styling settings. The top of this tab will show you a preview of how your Popup will look.
Existing Designs - This tab will display a preview of designs you have previously created, allowing you to easily set a uniform look across your site.
In this example, we have set a solid blue background colour, with white text.

The Rules tab will allow you define when, and where, your Popup will appear.
If you would like your Popup to appear 'on click' only, you should not add any Rules
To view the available Rules, click Add Rule.
Show When - When should the Popup appear. You can choose between a First visit to a page, or Every Time the page is visited.
Pages - Which pages the Popup should appear on. You can select All Pages, or an individual page. If you want your Popup to appear on a few pages, but not all, you can add additional rules from the Add Page option.
Delay - How long should the visitor be on the page before the Popup appears. You can set the Popup to appear between 0 and 360 seconds after a visitor accesses the page(s).
In this guide, we have selected our Popup to appear on the Homepage after 5 seconds.

Once you are happy with all aspects of the design, select Edit Popup Content. If you are simply editing the look or behaviour of your Popup, click Finish.
Now the styling of the window is complete, you can start adding the content you would like visitors to see. If you have been following this guide from the beginning you should see a screen allowing you to edit this, as shown below. You can also edit this content by selecting the Edit Icon on the Manage Popups window.

This Pop Up window can now be edited as any other Content Area within RQS.
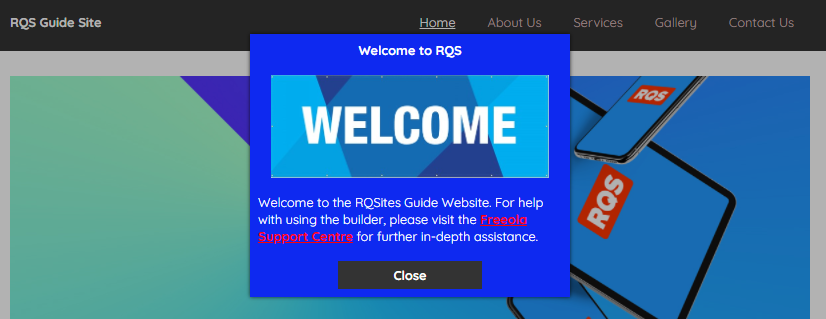
For this example we have removed an un-needed icon, expanded the text and added an image and a link to an external site. However - as with all other content areas - you could also add videos, animated images, snippets, buttons etc.
For a full guide on adding content to a Content Section, please visit our Using Content Sections guide.

If you do not want your Popup to appear automatically you can also set it to appear when a word, line of text, or image is clicked on your site - just like a normal hyperlink.
To use a Popup in this manner firstly create your Popup design (as above) but leave the Rules tab blank. Now edit your Popup (again, as above) to include your desired information. Once finished, visit the page that will display the Popup within the editor.
Now edit, or add, the content you wish to link to the Popup, highlight the text or image, then select the Link item from the editor menu.
For this example we are using a text link for the message.

From the Edit Link window select Link to a website popup then choose your Popup from the provided list.

On the following window you can now set some optional Mouseover Text and the Target. In nearly all instances you will select Open in Current Window from the Target field.
Once you have confirmed your options click Finish then Finish again to save your changes.

Visitors to your site will now be able to see your Popup message when they choose, rather than after a set period of time.
Live Chat is offline
Live Chat is available:
9:30am to 5:30pm Monday to Friday (excluding bank holidays).
It appears you are using an old browser, as such, some parts of the Freeola and Getdotted site will not work as intended. Using the latest version of your browser, or another browser such as Google Chrome, Mozilla Firefox, Edge, or Opera will provide a better, safer browsing experience for you.