Embedding a Google Calendar
Last updated on by Freeola Support
If you use a Google Calendar to keep your customers, visitors, or members up-to-date with events related to your website, the RQS Website Builder Snippet feature allows you to include this directly onto your webpage.
This calendar section will automatically update every time you add an event, is fully interactive and even provides an option for visitors to save your event into their own Google Calendar.
Due to restrictions put in place by Google, you can only obtain the codes required from the desktop website, not the mobile or app version of the Calendar.
To start, open your Google Calendar then select the Settings (Cog Icon) from the top-right corner then Settings again. In the left-hand pane, click the Calendar you would like to embed.

In order for your Calendar to appear for all visitors to your site you will be required to make this Public.
To do so, click Access Permissions For Events on the left-hand pane (or scroll down to the section headed the same thing in the main content area) and tick the box next to Make Available to Public.

Next, click Integrate Calendar (or scroll down to that section) then Customise. This will open a new tab allowing you to set certain aspects of your Calendar for when it displays on your page. This page allows you to customise what displays on the calendar, the colour and size of the calendar and also allows you to incorporate other calendars within your Google account, if desired.

Once you have designed your calendar either manually copy the code within the Embed Code field, or click the Copy Icon to automatically copy this code into your clipboard.

Now login to your RQS builder. Select the page you wish to add this content on from the Manage Pages menu item then using the Right-Click Menu, use the Edit Content option (or Add a Content Section) within the area you would like the Google Calendar to display.
When editing the Content Area, right-click again and select Add Page Element, then Add Snippet. Next move your mouse cursor to your desired location, and click to Save.
In the example below we are placing our Google Calendar at the top of our content area.

Now either Double-Click the Snippet Area or select Manage Snippets from the Website Tools menu to open the Manage Snippets window. Select Create a New Snippet then enter your chosen Snippet Name in the relevant field.
We would advise you choose a Name that you can later identify, such as Google Calendar, or Events Calendar.
If you have created a Snippet previously that you would like to edit, simply select the Edit Icon next to the Snippet Name to open this window.

Now paste your code from Google into the Snippet Content field.
If your browser does not allow you to Right-click>Paste, then you can use the keyboard shortcut of 'CTRL+V' to add this information.

Click Finish once done.
You will be returned to the Manage Snippets window, from which you will need to select your new Snippet by selecting the radio button on the left. Once you have done so, click Finish (or Select Snippet).

Your Snippet Element will now update to show your Snippet Name and will allow to you change placement again, if required.
Due to the width of the Google Calendar information you will need to increase the width of your Snippet to 20 columns to see information for every day.

You can also add a Google Calendar button to your website so visitors can quickly save your event on their own Google Calendars.
To let anyone save your calendar event you'll need to make your calendar public, if you haven't done so already. If you are following this guide you will already have done this. If required, you can return to this part of the guide here.
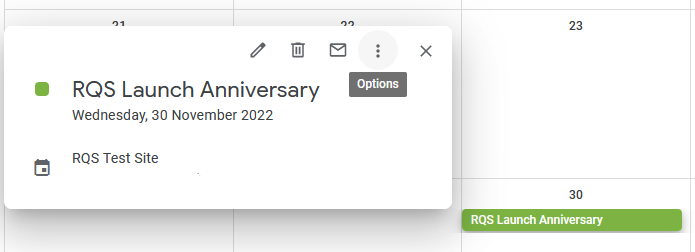
To create this link on your site create your calendar event (or navigate to a previously created event) then select Options.

From the menu that opens click Publish Event then Copy next to the HTML Code field on the Publish Event window.

Once the code has been copied return to the RQS Builder and create your Snippet - as we explained above.
In order to see the entire Google Calendar Button a Snippet width of 3 columns is required.
In the example below we have added some text, placing the button underneath.

Click Finish to save your changes and return to the builder. Your event button will now appear for all visitors allowing them to add your event to their own Google Calendar.

Live Chat is offline
Live Chat is available:
9:30am to 5:30pm Monday to Friday (excluding bank holidays).
It appears you are using an old browser, as such, some parts of the Freeola and Getdotted site will not work as intended. Using the latest version of your browser, or another browser such as Google Chrome, Mozilla Firefox, Edge, or Opera will provide a better, safer browsing experience for you.