Setting up Freeola Email in Outlook 2013
Last updated on by Freeola Support
7 out of 7 people found this article useful.
Welcome to the Freeola Internet customer support pages. This guide is designed to help with setting up a Freeola email address on Microsoft Outlook 2013. For more internet help topics please visit our main Support Page.
If you do not already have Outlook 2013 installed, you should be able to install it from your Microsoft Office 2013 installation disk. Alternatively, if you would prefer to use another e-mail client, you may be able to find a relevant guide on the Freeola E-mail Support Guides page.
Before Continuing
Please visit your MyFreeola account and make a note of the following information before continuing, you'll need to know this for later on in the guide:
1 - What protocol your e-mail address is set up to use (IMAP or POP3).
2 - What service is assigned to your e-mail address (EmailPro, Free Email or One Address).
3 - Your e-mail address password.
You can find this information by clicking Email Settings in the left-hand navigation in MyFreeola, then My Email Addresses. You should then be able to click Settings & Features button next to the relevant e-mail address to view all required email settings.
Load Microsoft Office Outlook 2013 from the Windows Start Menu.
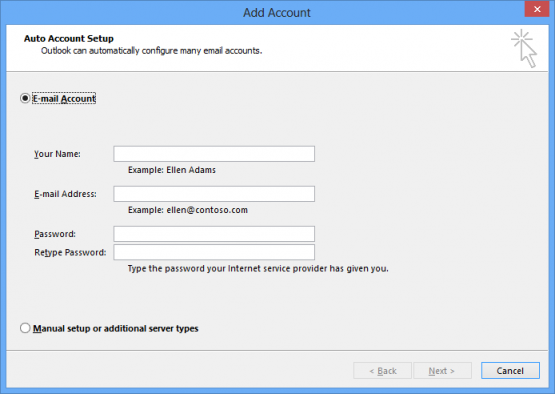
If this is the first time that you have launched Microsoft Office Outlook you should automatically be shown a form similar to the one pictured below.
If this shows, please proceed to Step 4.![Microsoft Office Outlook 2013 Welcome to Outlook 2013 Microsoft Office Outlook 2013 Welcome to Outlook 2013]()
If this form does not show, you will need to select File, Info and then Add Account.
Select the Manually setup or additional server types option and press Next to continue.
![Microsoft Office Outlook 2013 Account Type Selection Microsoft Office Outlook 2013 Account Type Selection]()
You will then be asked to specify the service type. Select POP or IMAP from the options provided.
![Microsoft Outlook 2013 Service Type Microsoft Outlook 2013 Service Type]()
In the next window you will be asked to enter Freeola's e-mail settings:
Your Name - Enter the name that you would like to appear on outgoing mail.
Your email address will need to be entered, in full, into the Email Address field.
Account Type - Select IMAP or POP3 depending on the setting in your MyFreeola account.
Incoming Mail Server- This will take the form of yourdomainname.freeolamail.net where 'yourdomainname' is your domain name with any dots ( . ) replaced with hyphens ( - ).
For example, if your domain name was freeola.co.uk, the incoming mail server would be freeola-co-uk.freeolamail.net.Outgoing Mail Server - Should be set to use smtp.freeolamail.net.
Please Note: This Outgoing/SMTP server is only accessible if you are subscribed to our EmailPro service or are using a Freeola Internet connection.User name - Your full E-mail Address.
Password - should have already been obtained at the start of the guide. If you do not already have this information, it can be obtained from within your MyFreeola Account.
Now select More Settings then Outgoing Server. On this tab check My outgoing server (SMTP) requires authentication.
![Microsoft Office Outlook 2013 Manual Account Settings Microsoft Office Outlook 2013 Manual Account Settings]()
In the same window, select the Advanced tab.
For Incoming server enter 993 if you are using IMAP, 995 with POP and select SSL.
For Outgoing server (SMTP) enter 465 and select SSL.
Click OK and then Next.If you then press Next, then Finish to close the wizard, your settings should be saved and your e-mail client should now be configured and ready for use.
Live Chat is offline
Live Chat is available:
9:30am to 5:30pm Monday to Friday (excluding bank holidays).
It appears you are using an old browser, as such, some parts of the Freeola and Getdotted site will not work as intended. Using the latest version of your browser, or another browser such as Google Chrome, Mozilla Firefox, Edge, or Opera will provide a better, safer browsing experience for you.


