Mozilla Thunderbird - Backup & Restore
Last updated on by Freeola Support
3 out of 3 people found this article useful.
Welcome to the Freeola Internet customer support pages. This guide is designed to help with ensuring that you fully back up your mail client, Mozilla Thunderbird, should you need to upgrade your mail service.
This guide was written using Windows 10 and Thunderbird 60. The process of backing up this software on other versions will be similar, but may feature slight wording differences.
This process has been streamlined greatly by Mozilla since the creation of this guide. If you are using an up-to-date version of Thunderbird, please click here. Steps for older versions of the software can be seen here.
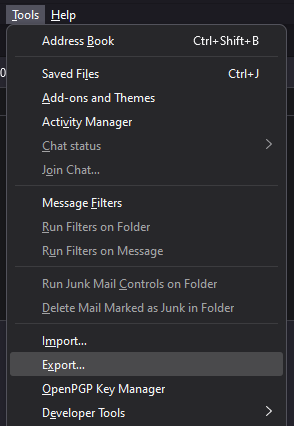
With Thunderbird open, click Tools then Export. This will open a new tab titled Export.
![Thunderbird Export Menu]()
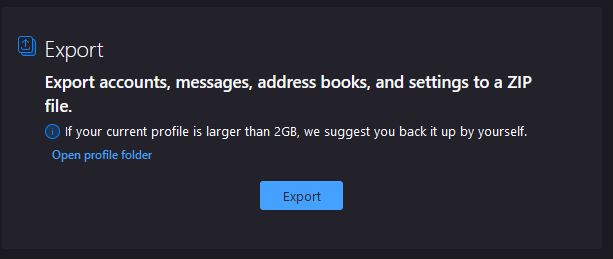
On the Export tab, click Export.
![Thunderbird Export Tab]()
A new window will open asking where you would like to save your backup file - we would recommend somewhere obvious, such as your Desktop or Documents folder. If you wish, you can change the filename also.
![Thunderbird Export to a ZIP]()
Once you have selected the location of the file, Thunderbird will now export to your specified location. Depending on the size of your content, this may take a few minutes.
![Thunderbird Exporting Progress]()
Once this has completed, click Finish to be returned to your Inbox. Your accounts, messages and Address Book will now be backed up to a single file on your computer.
Open up Thunderbird.
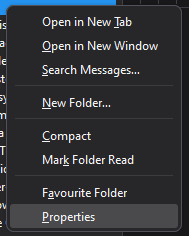
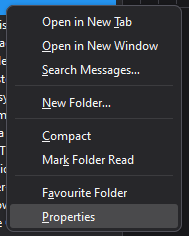
Right click the main Inbox folder for the account you wish to backup from the left hand side menu and select the Properties option.
![Thunderbird Inbox Menu]()
Copy the text from the location folder, without the prefix ('mailbox:///') and remove the very last mention of 'Inbox', the result should look like this:
'C:/Users/*yourusername*/AppData/Roaming/Thunderbird/Profiles/*****/Mail/*your mail server*/'![Thunderbird Folder Properties Thunderbird Mailbox Location]()
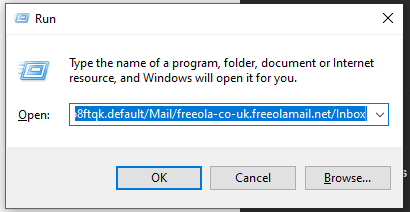
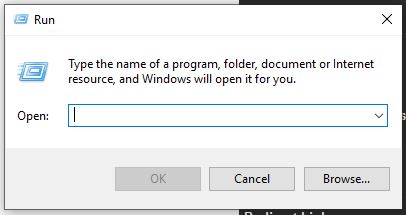
Now you will need to open this folder. To do so, click your Search Icon or Bar and type Run. This search should return the Run Application, which you should open. In the box that opens, paste the information from the previous step into the provided field and click OK.
![Windows 10 Run App]()
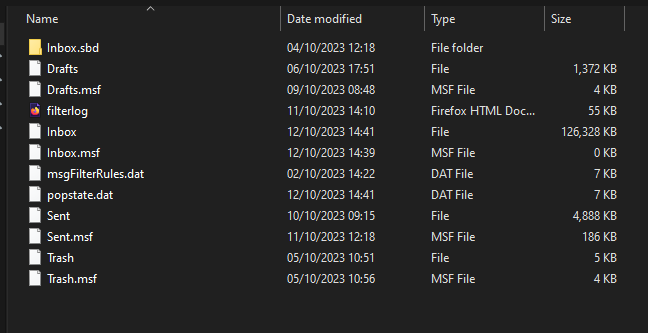
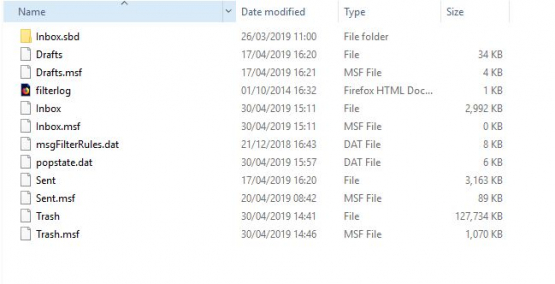
You will now be shown all of the files that contain your messages, simply copy and paste these to a safe location, such as your Documents folder or Desktop.
![A list of folders for backup List of Thunderbird storage folders]() Your messages will now be backed up, should you need to delete the account.
Your messages will now be backed up, should you need to delete the account.
Open up Thunderbird.
From the Tools menu, select Address Book.
![Thunderbird Address Book Menu Option]()
Alternatively, select the Address Book option in the top menu.From the left hand side menu, select the Category of contacts you wish to save. Please Note: Selecting All Address Books will result in a blank file.
![Select Personal Address Book Personal Address Book in Thunderbird]()
From the Tools menu select Export.
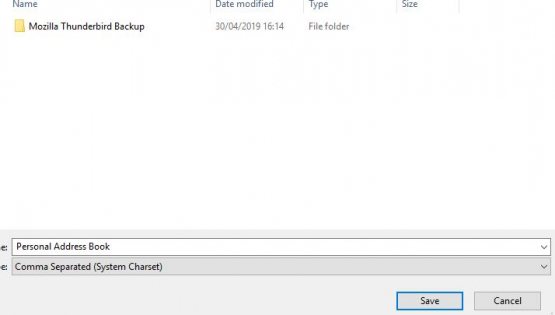
Ensure that Comma Separated is selected and that you name your backup sensibly. Use the Save button to save your files in a safe location, such as your Documents folder or Desktop.
![Address Book Backup Location Back up Address Book in Thunderbird]() Once complete your Address Book will have been saved.
Once complete your Address Book will have been saved.
To restore your data to a current version of Thunderbird, first open the software then select Tools then Import from the top navigation menu.
![Thunderbird Import Menu]()
The Import Tool will now load, from the available options select Import from a file then Continue.
![Thunderbird Import from File]()
Now select Choose a ZIP file, then Continue.
![Thunderbird Backup from ZIP]()
After choosing your file, select which aspects of the folder you would like to import/restore, then Continue.
![Thunderbird Import Profile]()
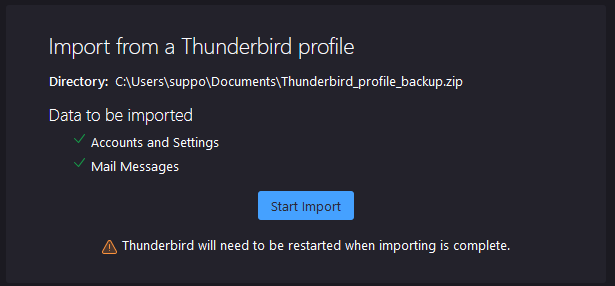
Finally, you will be shown confirmation of exactly what will be Imported/Restored. Click Start Import to begin this process.
![Thunderbird Start Importing]()
Your import should now begin. Depending on the size of the file(s) this may take several minutes.
Open up Thunderbird.
Right click the main Inbox folder for the account you wish to backup from the left hand side menu and select the Properties option.
![Thunderbird Inbox Settings]()
Copy the text from the location folder, without the prefix ('mailbox:///') and remove the very last mention of 'Inbox', the result should look like this:
'C:/Users/*yourusername*/AppData/Roaming/Thunderbird/Profiles/*****/Mail/*your mail server*/'![Thunderbird Folder Properties Thunderbird Mailbox Location]()
Now you will need to open this folder. To do so, click your Search Icon or Bar and type Run. This search should return the Run Application, which you should open. In the box that opens, paste the information from the previous step into the provided field and click OK.
![Run App in Windows 10 Windows 10 Run]()
Close Thunderbird.
Copy and paste your previously backed up messages into this folder, overwriting any files that prompt you to do so.
![A list of folders for backup List of Thunderbird storage folders]() Your mail will now have been restored.
Your mail will now have been restored.
Open up Thunderbird.
From the Tools menu, select Address Book.
From the Tools menu select Import.
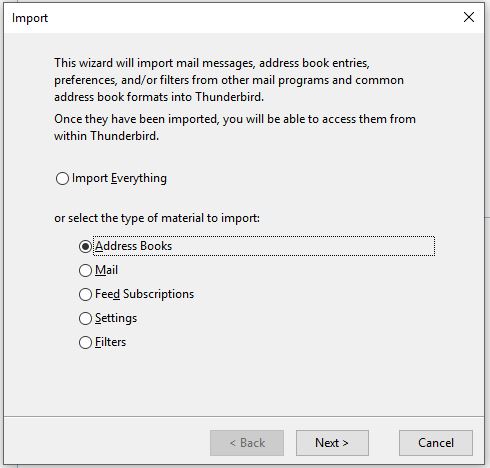
From the list of options provided, select to import an Address Book and press Next.
![Choose to Import Address Book Thunderbird Import Window]()
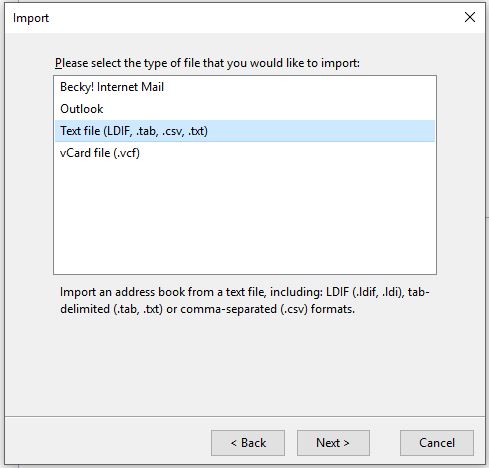
You will now be asked to specify which type of file you are trying to import, if you are restoring a file backed up by using this guide, please select the option named Text file (LDIF, .tab, .csv, .txt) and press Next.
![Select Text File to Import Thunderbird Import Text File]()
Use the Open window to find your backed up Address Book and click Open.
Your address book will now have been imported and can be found from the left hand side menu in your Address Book.
Live Chat is offline
Live Chat is available:
9:30am to 5:30pm Monday to Friday (excluding bank holidays).
It appears you are using an old browser, as such, some parts of the Freeola and Getdotted site will not work as intended. Using the latest version of your browser, or another browser such as Google Chrome, Mozilla Firefox, Edge, or Opera will provide a better, safer browsing experience for you.



 Your messages will now be backed up, should you need to delete the account.

 Once complete your Address Book will have been saved.



 Your mail will now have been restored.