Adding an Image Gallery
Last updated on by Freeola Support
3 out of 3 people found this article useful.
The RQS free website builder helps you to easily design your pages with the addition of Page Sections. These Page Sections can be added almost anywhere on your website giving you the opportunity to make something really unique.
This guide will outline how to add, edit, and make use of one of these Page Sections, Image Gallery.
An Image Gallery can be used to showcase a series of images on your website with optional descriptions. An Image Gallery is a great way to easily share your photos or pictures with visitors to your website.
The following guide assumes you are adding a new Section to an existing page. If you are creating a new page and using an Image Gallery Section as a starting point, the following process is exactly the same.
To add a new Page Section to your page right-click any area within your content to open the RQS Menu, then select Insert Page Section. From the secondary menu that opens, choose where you would like the section to initially appear. You can either Insert Section Above or Insert Section Below the selected location.
This placement isn't final, you can still move your Page Section once created.

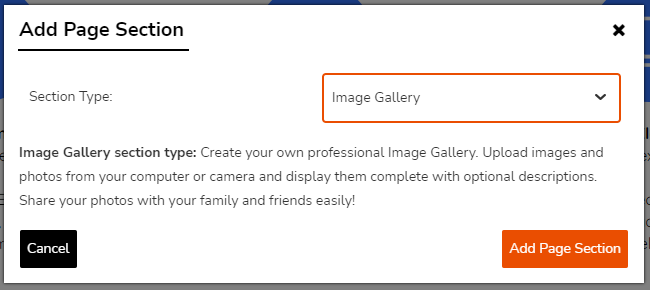
Once you have chosen your initial placement the Add Page Section window will open allowing you to select a Section Type. For this guide, we are selecting Image Gallery. Click Add Page Section to continue.
After choosing to add a Gallery, the Gallery Settings window will open allowing you to customise the look of the Gallery section or page.
Gallery Type - The style of Gallery you would like to use, Image Grid, Images with Captions or Slideshow. Depending on what style you select, you may be provided with an additional option.
- Images Per Row - For Image Grid only. Select how many images you would like to appear in each row of your Grid, choose between 2 and 7.
- Layout - For Images with Captions only. Choose between a single column of images, or two columns.
Crop images to fit - If you are happy for the RQS Builder to automatically adjust your images to fit within the Gallery space, select this option.
Use website colour scheme - By default your Gallery will use your Website Colour Scheme. If you would like to manually choose a colour for the Frame and Text, Untick this option.

Once you are satisfied with your Gallery Settings choices, click Finish. You will now be taken to your Media Library to choose images to add to your new Gallery.
If you would like to change your Gallery Settings at a later time, Right-Click the Gallery Section then select Gallery Settings.
Adding Images to the Gallery
If you have been following this guide then your Media Library should already be open ready to add your image(s). In order to add images from the builder Right-Click within the Gallery Section, then Manage Gallery Images to open the Gallery Images menu before Add Images to open your Media Library and add your images.

Using Images from your Media Library
When your Media Library opens, all images you have previously uploaded or used on your website will be listed along with their filenames.

Underneath each image are four options:
Tickbox - In the context of an Image Gallery, ticking this option will select this image for use within your Gallery.
Paintbrush/Edit - This option will allow you to edit the selected image, you can either rotate, resize or crop the image to your specifications. Your edited image will then be saved within your Media Library separately from the original.
Cog/Details - This option provides some additional information on the image such as Full Filename, File Size and Upload Date.
Trash Can/Delete - Select this item to remove an image from the Gallery, a pop-up window will ask to confirm this action.
To an an image, or images, to your Gallery tick the box underneath each then click Select Images. This will return you to the Manage Gallery Images window.
Using an Image from the Freeola Stock Image Library
To add an image to your Image Gallery from the free Freeola Stock Image Library you first need to add this to your own Media Library. To do this, select Stock Images from the Media Library window, this will open the Stock Image Library.

This window allows you to browse the hundreds of free stock images provided by Freeola. You can either navigate page-by-page using the pagination found at the bottom of the menu or use the two drop-down menus to filter by Category and Colour.
Once you have decided on an image to add to your Media Library, tick the Add Image option underneath it. You can tick multiple images and your selection(s) will hold through filtering and navigating through the different pages of the window.
When ready, click Add to Media Library.
You will now be returned to your Media Library with your new images already selected. To add these to your Gallery, click Select Images.
Using or Uploading your own images
If you would like to use your own images on your site within your Image Gallery you can do so through the Upload Media option within the Media Library.
To upload your images either drag the file into the Upload Media window or select Browse Files to select your files from the new window that appears. Both options will allow you to upload multiple files at once.
As soon as the Progress bar is at 100% and Details shows Success you can click Finish to add these files to your Media Library.
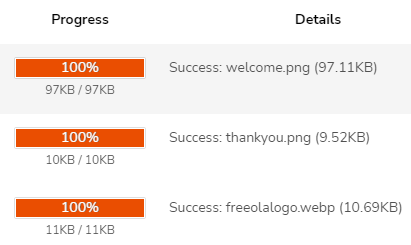
If the upload fails this is likely due to an incompatible file-type or extremely large image. Please check you are using a valid image file and that your image is less than 50MB.
You will now be returned to your Media Library with your new images already selected. To add these to your Gallery, click Select Images.
Once your images have been added to your Gallery you can change the order of these from the Manage Gallery Images window. If you have just added images to your Gallery you should be returned to this page automatically, but it can be accessed any time from the RQS editor by Right-Clicking within the Gallery Section, then Manage Gallery Images.

Adding Image Titles and Descriptions
The first option on the Manage Gallery Images window allows you to set Titles and Descriptions for each of your images. To add this information to your images, click the Show image titles and descriptions tickbox in the top-right corner. This will add two new fields next to each image:
Image Title - Use this field to enter a short title for your image.
Image Description - This larger field can be used to provide a long description of the image, giving your visitor more information on what they are looking at.
Depending on the Gallery Type you selected earlier, this information will appear in slightly different ways. For both the Grid and Slideshow options this text will appear on the expanded view image, if you have chosen Images with Captions then this information will automatically appear next to each image.
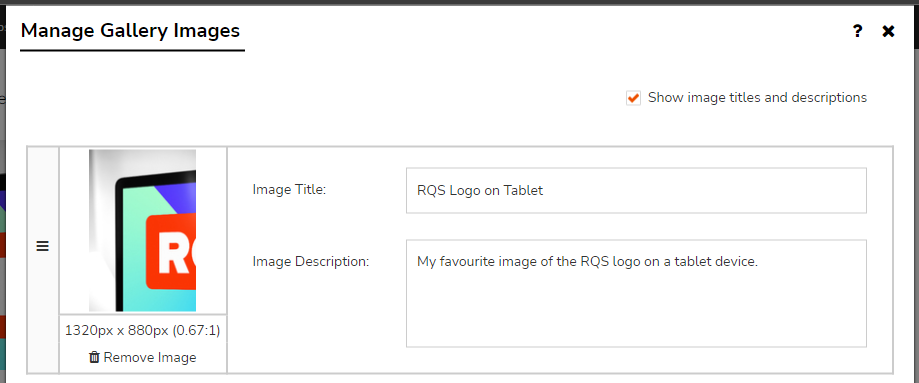
Unticking this option WILL NOT remove your entered Title and Description. To make managing your images easier, we would advise only enabling this option when adding or editing these fields.
Click Finish to save your changes.
Changing the order of your images
For the below steps, we recommend that Show image titles and descriptions is NOT enabled.
If you wish to change the order of the images within your Gallery you can easily do so from the Manage Gallery Images window. Each image within the Gallery will include a small icon to the left-hand side that looks like three horizontal lines (some call this a hamburger icon) e.g. ≡.

Once you have found the icon you can use this to 'click and drag' your image to your desired location within the Gallery list. Releasing your mouse button will 'drop' the image in its new location.
Once you have decided on the order of your images, click Finish to save.
If you no longer require an image within your Gallery you can easily remove it from the Manage Gallery Images window.
Beneath each image within the Gallery you will see a Trash Can icon next to the text Remove Image. Clicking either of these will immediately remove that image from the Gallery.
![]()
If you wish to re-add the image you will need to use the Add Image option on this window.
The sample Image Gallery includes a small section intended for a short introduction for the Gallery. You may find this useful for providing your visitors a brief outline of the images you have chosen to display in this area of your website.
To edit this section, Right-Click anywhere within the Image Gallery area then select Edit Intro Content.

The introduction can be edited in the same way as any other Content Section of the site. A full in-depth guide on adding information to this section type can be seen on our Content Section guide.
However, if you wish to simply edit the default text you can do so easily by Right-Clicking the area and selecting Edit Text Area. If you wish to remove the Introduction completely select Delete Text Area from the Right-Click Menu.
In the example below, we have centre aligned the text and updated the content to better fit our chosen images.

By default, the Image Gallery will use your Site Colour Scheme. However, should you wish to customise this section of your site to make it stand out from the rest, you can do so from the RQS Right-Click Menu. To open this menu, right-click anywhere within the Contact Form Section and choose Section Styling from the menu.

Backgrounds: If you would like use a custom background across the entire width of your site for this section tick the Custom Full Width Background, if you would like your custom background to only cover the Image Gallery section of the page, tick Custom Content Width Background.
These options are not mutually exclusive; the RQS Builder allows you to use both options simultaneously, individually, or not at all.
Once you have decided where your custom background will display, click the large rectangle underneath your selection. This will open the Edit Background window.

This window will offer two tabs: Customise will allow you to create a new background using either a solid colour or image and Existing Backgrounds will allow you to choose from a previously created background.
The drop-down menu on the Customise tab provides several options:
Colour Only - This option allows a solid colour background. By default this will be a transparent colour, but you can change this easily by clicking the small colour square.
Image - These options will allow you to use an image as your section or site background. To select your image select Image, this will open your Media Library. You can either select your desired image from this selection, select a Stock Image or use Upload Media to add a new image. You can also change your background colour should your image selection not fill all available space.
Resize to fill area - This option will resize your image to fill your background space completely. This option is not recommended for very small images.
Fixed position sticky image - This option will expand your image to cover the background, but this will remain static when scrolling through the page content. As you will likely only see a small part of this image, this is not recommended for an individual section of the page.
Centred at original size - This option will set your image central to the content. If the image is too small to cover the entire area, some tiling (or repeating) of the image will occur.
Tile over entire area - This option will repeat your image over the entire background area. This option is recommended for smaller, simple, images.
Custom - If you wish to further customise how your background image displays, this option allows you to do so. Recommended for Advanced Users only.
Once you have made your decision, click Finish to save.
Text Colours: If you would like to use a different colour font in your Contact Form from the rest of your site tick the Custom Text Colours box on this window.
This option will allow you to set a custom Text, Link and Link Hover colour. Simply select the colour block next to each option to open the colour picker.

Other: This short section allows customisation of the Breakpoint (The point at which your content begins optimising on smaller screens) and Padding (The size of the space between the content) of this Site Section.
Unless you have a specific reason to do so, it is recommended to leave both of these settings as Off.
Existing Designs: If you have designed content styling already within RQS you can easily select it from this tab.
Once you have decided on your changes, click Finish to save and close the window. You will now be returned to the editor with your changes in place.

If you would like to change where your Image Gallery appears on your webpage Right-Click and select Move Page Section from the RQS Menu. This will open a secondary menu that will allow you to move the Section Up, or Down the page.
Live Chat is offline
Live Chat is available:
9:30am to 5:30pm Monday to Friday (excluding bank holidays).
It appears you are using an old browser, as such, some parts of the Freeola and Getdotted site will not work as intended. Using the latest version of your browser, or another browser such as Google Chrome, Mozilla Firefox, Edge, or Opera will provide a better, safer browsing experience for you.