Setting Custom DNS Records
Last updated on by Freeola Support
21 out of 31 people found this article useful.
Setting custom DNS records allows you to take different aspects of your domain hosting and have them handled by different providers. For example, if you have built a website with another provider, you are able to point an A Record to their server. This would give them control of your website, however keep the email hosting with Freeola.
The most common DNS changes are listed below. If you follow the link, you will be provided with more detailed instructions for how this change would need to be made within your Freeola account.
| Scenario | Records to change |
| Pointing website hosting elsewhere but keeping emails with Freeola | A & CNAME Records |
| Pointing email hosting elsewhere but keeping a website with Freeola | MX Records |
| Creating a Subdomain for hosting or verification | Subdomain |
| A more advanced DNS record change is required | SRV/TXT/SPF |
We also provide brief guides on the adding the most common third-party host records to your Freeola Domain Name at the end of this guide.
Pointing website hosting elsewhere but keeping emails with Freeola
An A Record is used to direct your domain name to a webserver on which your website is hosted. To make this change you will first require an IP Address from your website hosting provider. This will be in the form of a numeric quad, formatted similar to 89.248.48.130.
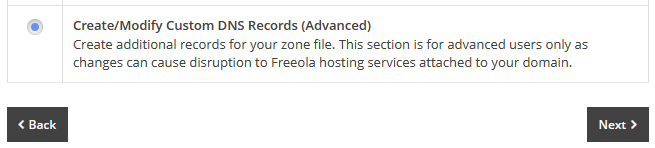
Once you have this information you will need to login to your MyFreeola account and select DNS Records (A/MX/SPF/TXT) then DNS Settings from the left hand navigation menu. If you then tick the box beside your domain name and press Change DNS you will be given three options, from these you will need to select Create/Modify Custom DNS Records (Advanced) and press Next.
After reading and agreeing to the warning page, you will be taken to a page where you can add, or change, your A Record. Simply select A - Point Web Address to an IP4 from the drop-down menu before clicking the Add+ button.
Enter the IP address you have been given in the field labelled 'Target IPv4 Address'. The 'Host' and 'Priority' fields should be left blank unless specifically provided this information by your new host.
Clicking Save will change this part of your domain name. If you would like to ensure all visitors to your site see your new webpages, you will be required to repeat the above paragraph ensuring to enter 'WWW' within the 'Subdomain' box before clicking Save.
You can now safely navigate away from this page, or close the window/tab.
Any change made to the DNS of your domain name can take up to 24 hours to fully complete, although most complete within an hour or two.
Pointing email hosting elsewhere but keeping a website with Freeola
MX Records are used by mail servers to determine which mail exchange server(s) mail should be sent to. In order to have your email hosting handled by another company, you will first need to contact the company in question and ask for MX server details. Once you have this information, please follow the instructions below to put the changes in place.
Once you have the MX Records you will need to login to your MyFreeola account and select DNS Records (A/MX/SPF/TXT) then DNS Settings from the left hand navigation menu. If you then tick the box beside your domain name and press Change DNS you will be given three options, from these you will need to select Create/Modify Custom DNS Records (Advanced) and press Next.
After reading and agreeing to the warning page, you will be taken to a page where you can add, or change, your MX Record. Simply select MX - Change email hosting (MX) from the drop-down menu before clicking the Add+ button. Enter the Hostname or IP address you have been given in the field labelled 'Hostname or IP'.
The 'Priority' field should be left blank unless specifically provided this information by your new host.

If you press Save these changes will be saved and you can now safely navigate away from this page, or close the window/tab.
Any change made to the DNS of your domain name can take up to 24 hours to fully complete, although most complete within an hour or two.
Adding a subdomain for additional hosting or verification purposes
If you have a part of your website you would like to separate from your main content, a development address or wish to create a more memorable URL you can pass to potential visitors, a sub-domain can easily be create within your account. Popular examples of this may be 'shop.yourdomain.com', 'dev.yourdomain.com' or 'contact.yourdomain.com'.
Additionally, some providers may ask you to create a CNAME record for your domain name to verify ownership. To do this, you will need details from the provider of the alias to be used and the host name to point it to.
Once you have the required details you will need to login to your MyFreeola account and select DNS Records (A/MX/SPF/TXT) then DNS Settings from the left hand navigation menu. If you then tick the box beside your domain name and press Change DNS you will be given three options, from these you will need to select Create/Modify subdomains to use with Web Hosting and press Next.

The following page will list your chosen domain name along with any other sub-domains currently created against it. To add your new sub-domain click Create Subdomain.
In Step 1 choose your sub-domain, for example noc.freeola.com.

For Step 2 you will need to select where you would like this subdomain to point to:
- A Record: To point to an external IP address.
- CNAME Record: To point to an external hostname.
- Freeola Service: To connect this to an SSD, VIP Hosting or RQS subscription within your MyFreeola account.
Once you have made your selection, click Submit.
If you select the A Record or CNAME options you will be taken to the Create New DNS Record page. The Host/Subdomain field will be pre-filled with your sub-domain from Step 1, simply enter the information given to you by your host in the IPv4/Hostname field before clicking Save.
A more advanced DNS record change is required
Some providers may ask you to add additional records to your domain name for various reasons - typically verification or mail security. To do this, you will need details from the provider of which type of record they would like added, and the information required for this record.
Once you have the required details you will need to login to your MyFreeola account and select DNS Records (A/MX/SPF/TXT) then DNS Settings from the left hand navigation menu. If you then tick the box beside your domain name and press Change DNS you will be given three options, from these you will need to select Create/Modify Custom DNS Records (Advanced) and press Next.

After reading and agreeing to the warning page, you will be taken to a page where you can add, or change, these advanced records. Simply select the required record type from the drop-down menu before clicking the Add+ button. Enter the information provided by your host within the supplied fields, ensuring not to add any additional spacing or characters not included within your hosts instructions.

Click Save to save these changes and add this record to your domain. You can now safely navigate away from this page, or close the window/tab.
Any change made to the DNS of your domain name can take up to 24 hours to fully complete, although most complete within an hour or two.
If you are looking for assistance in connecting your domain name to a specific third-party, we have included some basic instructions for the most common providers below.
Please note, this information is correct at the time of writing. If these changes do not connect your domain name to your host it is advisable to contact them directly for further assistance.
These records were correct as of the most recent update of this guide. For the most up-to-date records, please contact Shopify directly.
Firstly, login to your MyFreeola account. Select DNS Records (A/MX/SPF/TXT) then DNS Settings from the left hand menu. Now tick the box beside your domain name and press Change DNS. The following page will offer three options, from these you will need to select Create/Modify Custom DNS Records (Advanced) then press Next.
After reading and agreeing to the warning page, you will be taken to a page where you can add your records.To start, select A - Point Web Address to an IP4 from the drop-down menu before clicking the Add+ button.
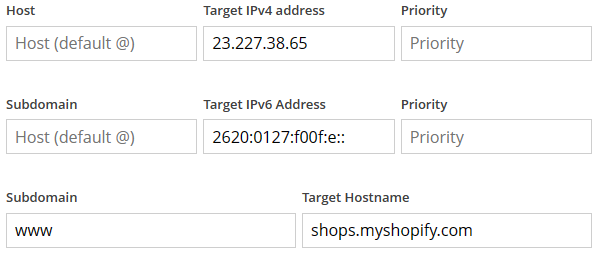
Enter the 23.227.38.65 in the field labelled Target IPv4 Address. The Host and Priority fields should be left blank.From the same drop-down, select AAAA - Point Web Address to an IPv6 address then Add+.
Enter 2620:0127:f00f:e:: into the Target IPv6 Address. As above, the Host and Priority fields should be left blank.Now select CNAME - Point Web Address to a hostname before clicking Add+ again.
Enter www into the Subdomain field and shops.myshopify.com within Target Hostname.![Shopify DNS Settings]()
Now click Save to save your changes, you may now leave this page.
To complete the process, log into your Shopify admin page and go to Settings then Domains. Click Connect existing domain, then in the Domain field enter your domain name then click Next. Finally, click Connect Domain.
If your site does not display after 48 hours you should contact Shopify directly for further assistance
These instructions deal only with the Freeola side of this process. The below guide assumes you have already completed all necessary steps within your Wix account - which they refer to as the 'Pointing Method'.
Once you have obtained the DNS Records from Wix and followed the 'Pointing' steps within your admin account with them, login into your MyFreeola account. Select DNS Records (A/MX/SPF/TXT) then DNS Settings from the left hand menu. Now tick the box beside your domain name and press Change DNS. The following page will offer three options, from these you will need to select Create/Modify Custom DNS Records (Advanced) then press Next.
After reading and agreeing to the warning page, you will be taken to a page where you can add your records.Now, ideally in a separate tab or window, access your Wix dashboard and follow their 'step-by-step outline' on connecting your domain to your Wix website until you reach I found the DNS Records. The following page should provide you with a CNAME and an A Record - which you should take a note of.
Now return to your MyFreeola account and select A - Point Web Address to an IP4 from the drop-down menu before clicking the Add+ button.
Enter the IP Address provided in the Value field in the field labelled Target IPv4 Address. The Host and Priority fields should be left blank.
Now select CNAME - Point Web Address to a hostname before clicking Add+ again.
Enter www into the Subdomain field and add the CNAME Value record provided in your Wix account within Target Hostname.
The image below shows an example of the information you may be asked to enter - your information may vary.
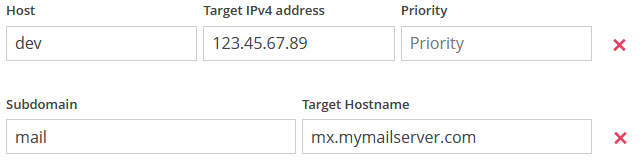
![Wix DNS Records Example]()
Now click Save to save your changes, you may now leave this page. If your site does not display after 24 hours you should contact Wix directly for further assistance.

These instructions deal only with the Freeola side of this process. The below guide assumes you have already completed all necessary steps within your Squarespace account and have access to, or have noted down, the unique code they provide you for verification.
These records were correct as of the most recent update of this guide. For the most up-to-date records, please contact Squarespace directly.
Firstly, login to your MyFreeola account. Select DNS Records (A/MX/SPF/TXT) then DNS Settings from the left hand menu. Now tick the box beside your domain name and press Change DNS. The following page will offer three options, from these you will need to select Create/Modify Custom DNS Records (Advanced) then press Next.
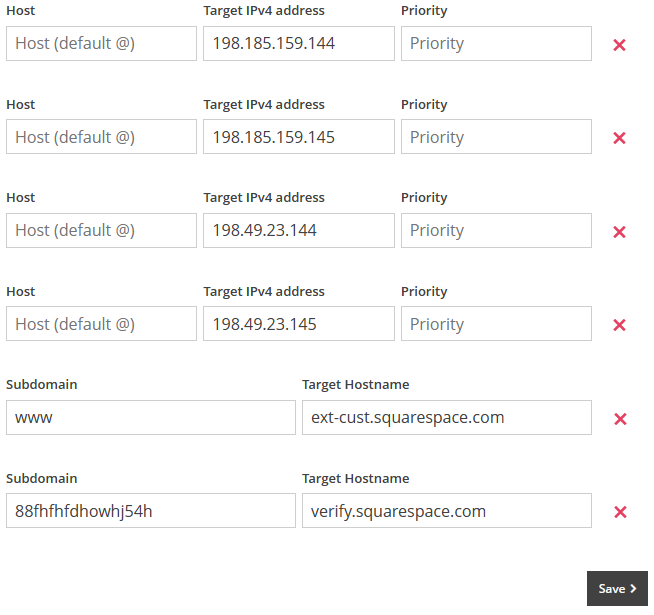
After reading and agreeing to the warning page, you will be taken to a page where you can add your records.To start, select A - Point Web Address to an IP4 from the drop-down menu before clicking the Add+ button FOUR TIMES.
In the first line enter the 198.185.159.144 in the field labelled Target IPv4 Address. The Host and Priority fields should be left blank.
Now, in the second record enter 198.185.159.145 in the Target IPv4 Address field, 198.49.23.144 in the third and 198.49.23.145 in the fourth. The Host and Priority fields should also be left blank for each of these records.
Now, select CNAME - Point Web Address to a hostname from the drop-down menu before clicking Add+ again TWICE.
In the first CNAME Record enter www into the Subdomain field and ext-cust.squarespace.com within Target Hostname.
In the second, Copy and paste the unique code provided by Squarespace in the Subdomain field and verify.squarespace.com within Target Hostname.![Squarespace DNS Settings]()
Click Save to save your changes, you may now leave this page. If your site does not display after 24 hours you should contact Squarespace directly for further assistance.
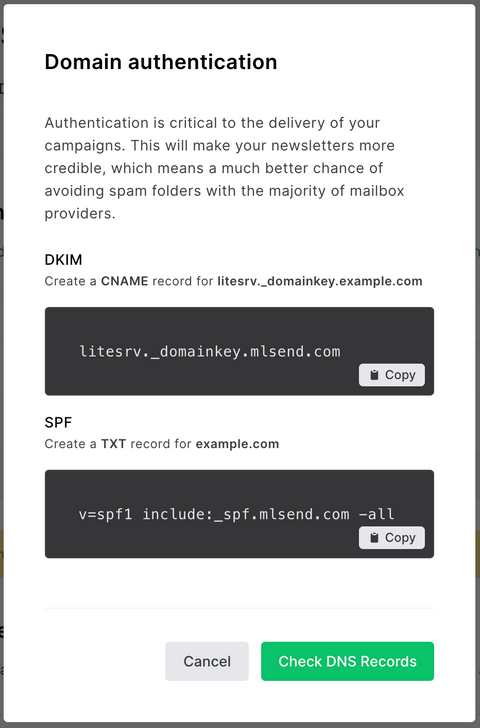
To help prevent your email messages being treated as 'spam' by some email providers (such as Google or Yahoo) MailerLite may recommend you add DNS Records to your domain name in the form of a DKIM and an SPF Record.
If you have not done so already, you will need to obtain these records from your MailerLite account. Once logged in, head to the Settings page, then select Domains.
Click on Authenticate or Add Domain (depending on whether or not you have verified your domain name with them). You will then be provided two records, a DKIM and an SPF, keep this page open or make a note of these records.
The image below is an example provided by MailerLite - your records may differ.
![MailerLite DNS Records]()
Now, login to your MyFreeola account. Select DNS Records (A/MX/SPF/TXT) then DNS Settings from the left hand menu. Now tick the box beside your domain name and press Change DNS. The following page will offer three options, from these you will need to select Create/Modify Custom DNS Records (Advanced) then press Next.
After reading and agreeing to the warning page, you will be taken to a page where you can add your records.
To start, select CNAME - Point Web Address to a hostname from the drop-down menu before clicking the Add+ icon. Then select TXT - Associate additional information (TXT) from the same drop-down before clicking the Add+ button again.
![Add TXT Record via MyFreeola]()
Using the image provided above as an example, enter litesrv._domainkey within the Subdomain field and litesrv._domainkey.mlsend.com within the Value field.
In the second line, leave the Subdomain field blank and enter v=spf1 include:_spf.mlsend.com ~all within the Value field.This is an example and your values will differ.
![MailerLite DNS Records]()
Click Save to add these records to your domain name.
Now return to your MailerLite account, select Domains then Authenticate next to your domain. Click the Check DNS Records button and, if the previous steps were added correctly, the domain should show as Verified.
Please note, it can take up to 24 hours for these new records to be fully acknowledged by MailerLite.


To help prevent your email messages being treated as 'spam' by some email providers (such as Google or Yahoo) Mailchimp may recommend you add DNS Records to your domain name in the form of DKIM and DMARC Records.
If you have not done so already, you will need to obtain these records from your Mailchimp account. Once logged in, head to your Account page, then select Domains.
Find your domain name in the list, then click Start Authentication. From the dropdown list select Other then Next.
You should now be given two CNAME Records, make a note of these.
The below image is an example provided by Mailchimp, your records may differ.
![Mailchimp example CNAME]()
Now, in a separate tab or window, open your MyFreeola Control Panel. Select DNS Records (A/MX/SPF/TXT) then DNS Settings from the left hand menu. Now tick the box beside your domain name and press Change DNS. The following page will offer three options, from these you will need to select Create/Modify Custom DNS Records (Advanced) then press Next.
After reading and agreeing to the warning page, you will be taken to a page where you can add your records.
To start, select CNAME - Point Web Address to a hostname from the drop-down menu before clicking the Add+ icon TWICE.
Using the image provided above as an example, enter k2._domainkey within the first Subdomain field and dkim2.mcsv.net within the first Value field.
For the second set of records, enter k3._domainkey in the Subdomain field and dkim3.mcsv.net in the Value field.Now click Save and return to your Mailchimp tab/window and click Next.
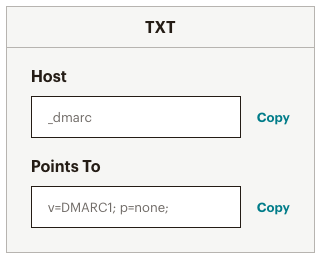
You should now be shown a TXT DMARC Record - make a note of this before returning to your MyFreeola tab/window.The below image is an example provided by Mailchimp, your record may differ.
![Mailchimp TXT DMARC example]()
This time, select TXT - Associate additional information (TXT) from the drop-down before clicking Add+.
Again, using the above as an example, enter _dmarc in the Subdomain field and v=DMARC1; p=none; in the Value field. Click Save.
![Mailchimp authentication record example]()
You can now close the MyFreeola tab or window.To complete the process, return to your Mailchimp account and click Next. Mailchimp will now verify your new records, a process that may take up to 48 hours.


Live Chat is offline
Live Chat is available:
9:30am to 5:30pm Monday to Friday (excluding bank holidays).
It appears you are using an old browser, as such, some parts of the Freeola and Getdotted site will not work as intended. Using the latest version of your browser, or another browser such as Google Chrome, Mozilla Firefox, Edge, or Opera will provide a better, safer browsing experience for you.