Changing from HTTP to HTTPS (Secured Site)
Last updated on by Freeola Support
10 out of 13 people found this article useful.
If you would like your site to display via HTTPS and have the 'padlock' icon shown within visitors web browsers, you will require an SSL Certificate. SSL Certificates further encrypt the information that is sent and received from your website protecting your user’s details while they browse your content, while also helping to increase your Search Engine ranking.
The first thing that you will need to do is purchase an SSL Certificate. While SSL Certificate come in three versions, the most common (and the one nearly all users require) is DV. If you are interested in the different types of SSL Certificate available, you can learn more about these and how you can verify them, in our helpful article "What Are The Different Types of SSL Certificates? Which Is Best For You?"
If you are subscribed to one of our VIP Hosting services you can apply a free SSL Certificate to your webspace and domain name from within your MyFreeola account. A guide on this simple process can be seen here.
Once you have purchased and verified your new certificate, there are some changes that you will need to make to ensure that your site and pages point to the HTTPS version. The process for this will vary depending on the structure of your site.
Providing that you have no custom coding, the change will be automatic. There is nothing more needed than following the verification set up. This will automatically switch your site to HTTPS.
If you have any custom code or snippets these will need to be checked and changed to the HTTPS version if needed. All full URLs must be checked - for example if it’s pulling from an 'insecure site' this can produce warnings on your browser.
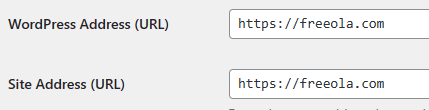
For WordPress sites using modern versions of the software, all of your links are relative to the URL; you will simply need to change the URL in the Admin Panel from HTTP to HTTPS.
To do this, login to your WordPress administrator account and go to Settings then General and ensure that the WordPress Address & Site Address are both HTTPS, then Save.
If you are using SSD WP or SSD Pro you can also amend the Site Address from the Wordpress Manager within cPanel.
Older Versions of Wordpress
If your site was set-up with an older version of WordPress (prior to version 4.1) everything such as links and images will be stored with the full URL, so you will need to run a Search & Replace in order to change everything over. You can visit the Wordpress Plugin Site for Search & Replace plugins or this third-party resource to download a file that you can add via FTP.
If you do use the second option, we would strongly advise that you delete the file upon completion to maintain security of your webspace content.
If you are unsure which version of WordPress you are currently using, this third-party website explains how you can easily check.
Please note the steps need to be taken are dependant on which version your site was set up on - not which version you currently have installed. For instance, if you have the latest version of WordPress, but you set your site up on a much older version of the CMS, you will still need to run the Search & Replace tools listed above.
When running a Search & Replace always remember to enter the full URL with https:// at the beginning.
An alternative method to force all traffic to the HTTPS version of your content is to add some code to the top of your .htaccess file. The code can be downloaded here, just replace yourdomain.com with your actual domain.
If you do not already have an HTACCESS file you can create one easily if you have access to a plain-text editor (such as Notepad or Notepad++) and an FTP Client (Filezilla, for example).
Firstly, using your plain-text editor, create a new file and enter the code linked above (and repeated below), just replace 'yourdomain.com' with your domain name:
RewriteEngine OnRewriteCond %{SERVER_PORT} 80RewriteRule ^(.*)$ https://yourdomain.com/$1 [R,L]
Next, save this file as htaccess.txt and upload it to the required webspace using your preferred FTP client (we recommend Filezilla - a guide on using which can be seen by clicking here) into the htdocs or public_html folder. Once this file has been uploaded, rename it to .htaccess.

Depending on your FTP client, and the settings within, this file may seem to disappear at this point. This is perfectly normal and nothing to worry about.
Once uploaded, visitors to your site will automatically be redirected to your secure content.
Finally, you can also automatically enable HTTPS redirect via your MyFreeola account if you have a VIP Hosting subscription.
Once logged in, select My Websites from the Websites & Hosting section of the left hand navigation menu, then Options & FTP Settings next to your chosen webspace/domain name.

This page will display all hosting information for the site, and provide an option for HTTPS Redirect. Simply enable this option to redirect all visitors to the HTTPS variant of your content.

If you are subscribed to SSD Hosting you will not need to take any action as the SSL and HTTPS redirection are enabled automatically for your webspace.
While the main priority is to ensure that all aspects of your site are directed to, and served by, HTTPS, if you are using a 3rd party application or builder you may need to contact your host for any specific instructions. Most popular programs will have support, advice or forums online that you can refer to for assistance with this.
While our certificates are compatible with most other hosting services, you may have to confirm with your hosting provider whether they are happy to accept a certificate that was purchased from a 3rd party.
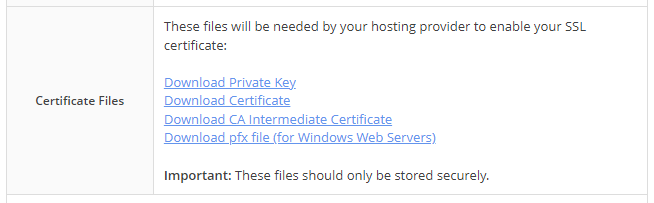
If you choose the external option, you will be provided with the relevant keys, certificates and files that may be required by your host within your MyFreeola account.
Visit our SSL Certificates Page, to take a look at the certificates we offer and to get started.
Live Chat is offline
Live Chat is available:
9:30am to 5:30pm Monday to Friday (excluding bank holidays).
It appears you are using an old browser, as such, some parts of the Freeola and Getdotted site will not work as intended. Using the latest version of your browser, or another browser such as Google Chrome, Mozilla Firefox, Edge, or Opera will provide a better, safer browsing experience for you.